Networking with a Raspberry
![]()
Introduction
As a developer, I have always felt safest in the code. For a long time, though, I assumed that “network stuff” involving servers and connections was complicated and unnecessary for me to know.
As the lines between the classically separate roles of ‘software developer’ and ‘operations engineer’ started to blend together into ‘DevOps’, I realised there was no escaping it.
Luckily, servers are nothing to be afraid of - in fact, they’re a handy, multi-bladed Swiss army knife that can be used for all sorts of things. In this post, I’ll be demonstrating some of the most common use-cases with the aid of the humble (but mighty) Raspberry Pi.
What this post covers
Let’s pretend you’re in the office of your company headquarters, Badgers 4 U, because offices are still a thing that people go to. You want to set up a really cool internal site so that people can find important (but not public) information about their favourite types of Badger.
To do that we’ll need to cover off a few things:
What you will need
A Raspberry Pi (I used a Raspberry Pi 4b) connected to your local WiFi network. However, if you don’t have a Pi to hand, you can use pretty much any other machine on your network.

Step 1: Web server
If you want people to be able to access your site then you need to have a way of providing it to them. For this you need a web server. This will store your site and hand it out to anyone who comes asking for it.
What is a web server?
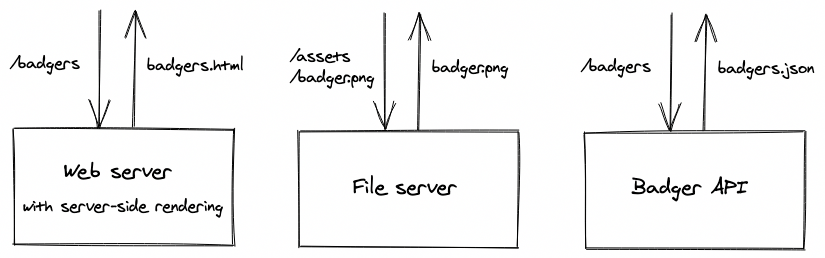
A web server is just some software running on a networked machine. It can be dumb, like a file server used to serve static documents (might sound familiar if you’ve ever used cloud storage solutions like an AWS S3 bucket, Google Cloud Storage or Azure Blob Storage) or a bit smarter, interpreting requests and doing some processing to dynamically render web pages (termed server-side rendering) or providing results to API requests (for example, a GraphQL API running on a NodeJS server).
Server options
For our purposes, we’ll need a simple, static file server. There are many popular options including1:
- Apache - open source, around since 1995, serves around 25% of the web
- Nginx - open source, released in 2004, more performant than Apache and has been growing in popularity, stealing a significant market share from Apache, serves around 37% of the web
- IIS (Internet Information Services) - created by Microsoft, tightly coupled to Windows, serves around 13% of the web
For this demo, we will be using Nginx because it’s easy to set-up and incredibly flexible, also serving as a reverse proxy (sneak peak of what’s to come).
Setting up Nginx
The following terminal commands on your Raspberry Pi should do the trick:
sudo apt updateto ensure that the package manager is up-to-datesudo apt install nginxto install nginxsudo /etc/init.d/nginx startto start the server
You can then go to http://localhost on the Pi and see the default Welcome to nginx! page!
And if you find the IP address of your Raspberry Pi (e.g. by typing ifconfig in the terminal) then you should be able to access it from your own machine by going to that IP in the browser.
The base configuration file for the server can be found at /etc/nginx/nginx.conf.
The settings for serving the default site on localhost are within the file /etc/nginx/sites-available/default, which establishes a single server, listening for all requests on port 80 (HTTP) and serving the HTML file /var/www/html/index.nginx-debian.html. This file is the entry point for your site.
Step 2: DNS
So we can now access our site from any device on the network by using the IP address of our Raspberry Pi. But an IP address isn’t the most ergonomic way to reach a site - all of our keen badger enthusiasts aren’t going to want to type that in every time they want to get some badger facts. Better would be a memorable name, like… badger.facts, right? So how do we make that happen?
We need to provide a mechanism to convert that memorable name that a user enters into an IP address so their computers can know where to go. We need DNS.
What is DNS?
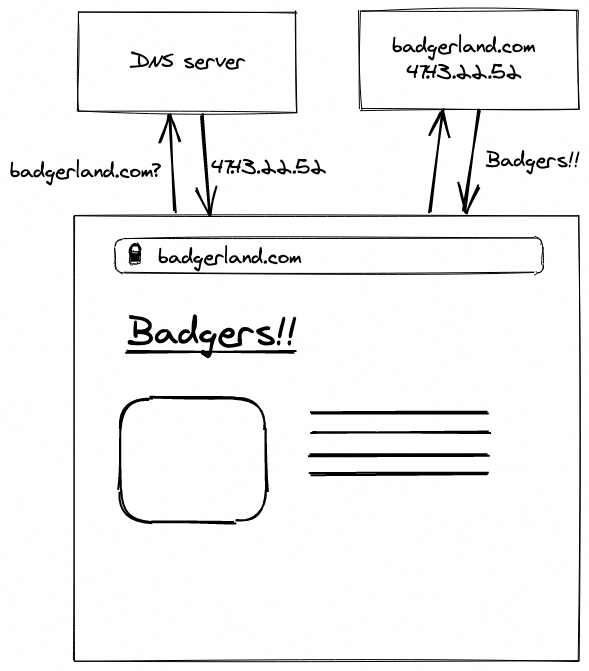
The Domain Name System is the address book of the internet, making sure each browser doesn’t get lost. A huge web of dedicated, interlinked DNS servers help answer every query on the internet, receiving requests like “badgerland.com?” and responding with “47.43.22.52”.
You can go to your computer settings and view the DNS servers that you’ve got configured for your WiFi - you’ll probably see an entry like 1.1.1.1 (Cloudflare’s DNS server) or 8.8.8.8 (Google’s DNS server).
Configuring DNS
For our example, we need a way of telling each device on our local network that badger.facts can be found on this network at the IP address of your Raspberry Pi. We need a local DNS server.
DNSMasq is a simple, lightweight DNS server that will do this nicely. To get set-up, enter the following in the terminal of your Raspberry Pi:
sudo apt update && sudo apt upgradeto ensure you have the latest package references and are fully up to datesudo apt install dnsmasqto install DNSMasqsudo nano /etc/dnsmasq.confand uncomment thedomain-neededandbogus-privlines - these prevent packets with malformed domain names and packets with private IP addresses from leaving your networksudo nano /etc/hostsand add a line at the bottom192.168.100.100 badger.facts, where the exact IP address should be replaced by that of your Raspberry Pi. The hosts file on any machine is used to convert domain searches to IP addresses, like a local DNS - in fact, it will be used here by the DNS server to resolve IP queries. We are saying that any queries forbadger.factsshould be answered with the IP address for your Pi, to reach the web server we set up earliersudo service dnsmasq restartwill restart the server to bring these changes into effect
You now need to tell your own machine that it should use this new DNS server. Go to your DNS server settings and add your Pi IP as the first option in the list, so that it is asked first (public DNS servers won’t know where to find badger.facts, of course).
Now go to your browser, type http://badger.facts and you should be greeted with a lovely page about badgers! Your machine is first going to your new DNS server on your Raspberry Pi to get the IP, querying that IP address and reaching the web server we set up in step 1 and receiving your lovely web page. Except… it’s on http, not https. Yuck!
Step 3: SSL certificates
The internet is moving away from the world of old, insecure HTTP sites towards HTTPS, an initiative driven in no small part by Google. But what’s so special about an “S”?
What is HTTPS?
HTTPS is HTTP over TLS (Transport Layer Security), meaning that it is fully encrypted end-to-end. This encryption is achieved with SSL (Secure Sockets Layer) certificates. Each certificate contains a public key that enables a secure handshake to take place to establish an encrypted connection before any real communication between a client (your browser) and server takes place.
The TLS handshake
The handshake to establish TLS goes (sort of) as follows:
- Client: hi, server! Let’s talk
- Server: ok, but people might be listening - let’s talk in code
- Client: ooo tricky, how can we agree on a code without someone hearing what we decide?
- Server: I’ve got an idea - here’s a box with an open lock on it, you put the code in there, close the lock and send it back to me. Then I can use my key to open it up when it arrives.
- Client: great idea! Here’s the code I created inside the locked box. Let’s use the code from now on.
- Server: wlkejf23iojfewooioiwaejf?
- Client: koijewf2903u0932i9evirj!!!

The box with an open lock on it in this over-stretched personification is a public key - part of an asymmetric key set. Data can be encrypted by anyone who has the public key (closing the lock) but it can only be decrypted by the person with the private key (opening the lock). In this case, that’s the server.
The ‘code’ generated by the client is a symmetric key - one that can be used to both encrypt and decrypt messages. Once both the client and server have the symmetric key, two-way encryption is achieved.
The public key used in this process is contained within the SSL certificate for a site. The SSL certificate is installed on the web server and any time a client comes along, the web server can provide the certificate to the client so that it can be used during the handshake process.
Certificates for site authentication
So you can talk securely to a site calling itself badger.facts - great. But what if, without realising it, you’re actually communicating with a devious hAXxoR who wants to steal your information?
In addition to containing a public key, an SSL certificate is used to prove a site is who it says it is. Each certificate is digitally signed by a Certificate Authority (CA) - a company that specialises in signing certificates to confirm sites are who they say they are. But how can we trust them - who authorises the authorisers?!
Each CA holds their own certificate signed by a Root Certificate Authority (root CA) - this is an organisation that is trusted by The Internet (Google, Mozilla, Apple, Microsoft…) to only endorse responsible CAs. This chain of signed notes is used to create a link of trust from the top authority down to each web site.

To acquire an SSL certificate you need to prove that you actually own the domain so you can’t pretend to be, like, Facebook or something.
So, what does that mean for our internal little site - do we need to prove that we own badger.facts so we can get a signed certificate? To do that, we would need to buy the domain name and expose the site to the internet for the CA’s to confirm it exists and that we run it. Seems like a lot of work considering the site is only available on our network.
Instead, we can create our own root CA called Certificates On Me (or something) and get all the devices on the network to agree that they trust this CA so that any certificates it signs will be accepted by the browsers.
Creating your own root CA
There are quite a few steps involved in this, so best if I hand off to an article I followed to get this configured successfully. This will take you through the steps of:
- configuring your root CA and generating a root CA certificate, which you can do on your Raspberry Pi
- adding this root CA certificate to the trusted list on your own machine
- generating certificates signed by this root CA for your website (e.g.
badger.facts)
Now the SSL certificate you just created, along with any others you create in the future, should be accepted by your machine.
Bundling certificates
In order to allow a browser to verify the chain of trust from a site’s SSL certificate to the (possibly several) intermediate CA that signed it and up to the root CA, it is common for a website to provide a ‘bundle’ of certificates. This contains all the certificates the browser needs to worry about in one package.
You can create a bundle by inserting the certificates into a single file, starting with the site certificate at the top, followed by the intermediate CA certificates and then the root CA certificate at the bottom.
In our example, we don’t have any intermediate CAs so the bundle would contain only 2 certificates.
cat badger-facts.crt root_certificate.crt >> badger-facts-bundle.crtto combine both certificates into a single bundle.
Your certificates may be suffixed with .pem to indicate that they are in PEM format (bas64 text compared to DER binary) - this is a valid format for a .crt file so you should be able to copy the contents in without conversion.
Enabling HTTPS on Nginx
In order to enable HTTPS on our site, we need to tell our web server (which we prepared earlier) to use this new site certificate for all HTTPS requests for our site.
sudo nano /etc/nginx/sites-available/defaultand add a newserversection to the bottom of the file that looks like:
server {
  listen 443;
  server_name _;
  ssl on;
  ssl_certificate /etc/ssl/badger-facts-bundle.crt;
  ssl_certificate_key /etc/ssl/badger-facts.key;
  location / {
    root /var/www/html;
    index index.nginx-debian.html;
  }
}
sudo /etc/init.d/nginx restartto restart the server
We now have a secure route defined on the standard HTTPS port (443), enabled with SSL and using our generated certificates to serve the site index file!
You should be able to go to a browser on your own device and reach your site at https://badger.facts over HTTPS!
HTTPS only
As a bonus, we can add a redirect from the original HTTP endpoint to HTTPS to ensure that whichever way someone tries to reach our site, they can only access it over HTTPS.
sudo nano /etc/nginx/sites-available/defaultand edit the original rule for port 80 to remove the entirelocationsubsection and replace it with the single linereturn 301 https://$host$request_uri;sudo /etc/init.d/nginx restartto restart the server
Now try reaching the site over HTTP (http://badger.facts) and watch as it magically gets upgraded to HTTPS. Lovely!
Step 4: Reverse proxy
A reverse proxy can improve performance, increase flexibility and boost security - let’s try it out.
What is a reverse proxy?
Reverse proxies in particular always frightened me - I thought that no one really understood them and people just used phrases like ‘reverse proxy’ to sound smart and scare junior devs. It turns out, they’re actually really simple.
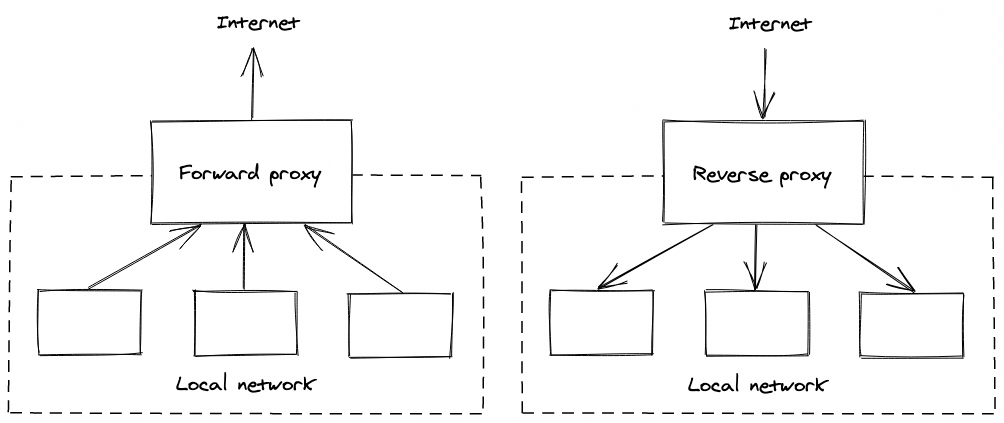
A standard (forward) proxy server sits in front of a network and relays requests from the machines on the network out to the internet, returning the responses to each machine.
A reverse proxy is the opposite - it accepts incoming client requests from the internet and sends them to the correct machine on the network, returning the machine’s response to the client. It’s pretty much that simple.
The reverse proxy becomes the public interface for a site - the address of the proxy is the one that DNS servers will hand out to clients.
There are many benefits that this extra layer can bring:
- Caching and SSL termination for decreased workloads on the destination servers
- Compression for reduced payloads and response times
- Decoupling of the publically accessible sites from the actual server configuration for increased flexibility of the infrastructure without public impact
- Increased security from reduced leakage of server configuration outside of the network
We can configure this for the Raspberry Pi quite easily - Nginx loves being a reverse proxy!
Configuring the proxy
At the moment, we have a single site configured, listening on ports 80 and 443 to requests for all domains.
Let’s update that to create a dedicated configuration for our site.
- Make a copy of the
defaultfile and name it according to your website, egbadger.facts.conf - Update the configuration for the
server_name(which is used to match the domain on incoming requests) from_(a wildcard) to that of your site (i.e.badger.facts). Do this for both the port 80 and port 443 server sections - Replace the contents of the
locationsection for the 443 server toproxy_pass http://badger.facts:8888;. This will tell Nginx that this server will act as a reverse proxy, passing the request transparently through to a server listening on port 8888 - Create a new
serversection at the bottom of the file, which will act as the new internal web server that will respond to requests that are passed through from the reverse proxy. It should listen on port 8888 and respond with the index page
server {
  listen 443;
  server_name badger.facts;
  ssl on;
  ssl_certificate /etc/ssl/badger-facts-bundle.crt;
  ssl_certificate_key /etc/ssl/badger-facts.key;
  location / {
    proxy_pass http://badger.facts:8888;
  }
}

server {
  listen 8888;
  server_name badger.facts;
  location / {
    root /var/www/html;
    index index.nginx-debian.html;
  }
}
Notice how the proxy server communicates with the internal server over HTTP - TLS is being terminated at the reverse proxy server so that all communication between our network and any clients is over HTTPS but within our ‘local network’, all traffic is HTTP.
In order to ‘activate’ this new configuration, we need to tell Nginx that this new site is now active and ready to be served. To do that, we create a symlink from the file in the sites-available directory to the sites-enabled directory:
ln -s /etc/nginx/sites-available/badger.facts.conf /etc/nginx/sites-enabled/badger.facts.confto create the symlinksudo /etc/init.d/nginx restartto restart the server
You should be able to reach your site from your own machine, as before, but now all traffic is going through the reverse proxy. As a user of the site, nothing has changed for you.
We could easily host multiple sites on our Raspberry Pi (or on other network devices) but have the DNS resolve all domains to the reverse proxy server, where our server rules could determine where they get sent. If we expected a lot of traffic, we could even configure Nginx to act as a load balancer, distributing site traffic across multiple web servers.
Summary
In this post, we’ve gone overboard in our attempts to serve an internal site on a network in order to demonstrate some of the key concepts regarding servers and networking.
You can take this further by adding caching to the reverse proxy, setting up the Raspberry Pi as a forward proxy using something like Privoxy or by going public and exposing your Raspberry Pi to the wider world. Go forth and network.
(N.B. If you spot any mistakes in this post please let me know or open a pull request!)
References
1 : https://digitalintheround.com/what-is-the-most-popular-web-server/