Next.js Deployment on Netify with Github Actions
TL;DR: Example working repository with the end state configuration.
Introduction
Recently, I’ve been involved in a couple of fast-paced projects where we’ve been asked to quickly deliver proof-of-concepts or simple web applications, and I’ve been trying to align on a tech stack and setup that would allow a team to hit the ground running and deliver web apps in a quick, productive, even fun way.
As you might have guessed by the title of this post, this will include Next.js, a framework for serverless full-stack apps using React, and deployments on Netlify, using the CI/CD offering of Github, Github Actions. I’ll talk briefly about the why for using each one next.
Next.js is arguably the quickest way to bootstrap a full-stack web app using React, especially if you’re using their create-next-app. It’s a very powerful and smart web framework, supporting different architectures, from completely staticly generated sites to server-side rendered ones. It also has a convention for serverless routes that can easily be deployed to popular serverless functions FaaS providers – this seems to be my prefered way of using it, the JAM stack way I suppose, where you have a completely static/pre-rendered single-page application front-end backed by serverless functions when you need server-side functionality.
There’s currently a couple of options on where to deploy such an app - from AWS (using for instance the serverless plugin) to Heroku, but for our use case, static hosting providers with some sort of FaaS offering are simple and work well, and Netlify fits the bill perfectly, having a huge community and decent tooling around their platform. Netlify supports Next.js deployments out of the box by converting API routes (and server-side rendered pages) into Netlify Functions, something that’s done behind the scenes via a plugin. Basically, it just works: create a Next.js app, push it to a Github repository, connect that repository with a Netlify site and you’ll have a working continuous delivery pipeline, including branch and preview deployments (from pull requests and, optionally, branch commits).
Another of such platforms that’s worth mentioning is Vercel. Vercel and Netlify feature sets are very similar, for the purposes of this tutorial, so both would be very valid choices. Vercel, being built by the same team behind Next.js, has the added advantage of sharing the same conventions as Next.js does, which makes the build process simpler as we wouldn’t need any special plugins for code transformation, as we will with Netlify. I’m picking Netlify here mainly due to my own familiarity with the platform and their tooling (UI, CLI, etc), but you could easily adapt this setup to work with Vercel instead (let me know if there’s interest, I’m happy to create a branch for this!).
Although these automated deploys work quite well, it’s often better to take control of the build and deploy process and have it running on a CI/CD pipeline you can extend - like Github Actions! This way, you have flexibility to run whatever other steps your site requires - from code formatting and linting tools to tests and other 3rd party service configuration. This presents the problem of us having to recreate some of that Netlify magic, but, as we’ll see, it is not that bad!
We’ll create a new Next.js site, deploy it to Github, connect it to Netlify and finally implement the needed Github Action workflows to get our continuous deployment ball rolling.
Putting it all together
Bootstrapping: Next.js, Github and Netlify
First off, we’ll use create-next-app to bootstrap our Next.js application. In a shell, run:
npx create-next-app your-app-name-here
Next.js will assume you’ll want to use yarn as a package manager, if that’s
not the case there’s a --use-npm flag you can use.
Assuming we’ve created a Github repository by this point, we simply add the
remote and push to the main branch:
cd your-app-name-here
git remote add origin git@github.com:$YOUR_REPO_URL.git
git push -u origin main
Finally, create a new Netlify site using their UI and hook it up to your Github repository - here’s a guide how to do so. There is a CLI as well, and we’ll be using it later, however at this stage it doesn’t really make things any simpler. When connecting Netlify to your repository, you’ll see it automatically knows it’s a Next.js website and sets the right build commands and plugins, which is nice, although we’re shortly going to be overriding some of that configuration when deploying from Github Actions.
After creating the site, open your Site Settings on Netlify and disable builds and
preview deploys:
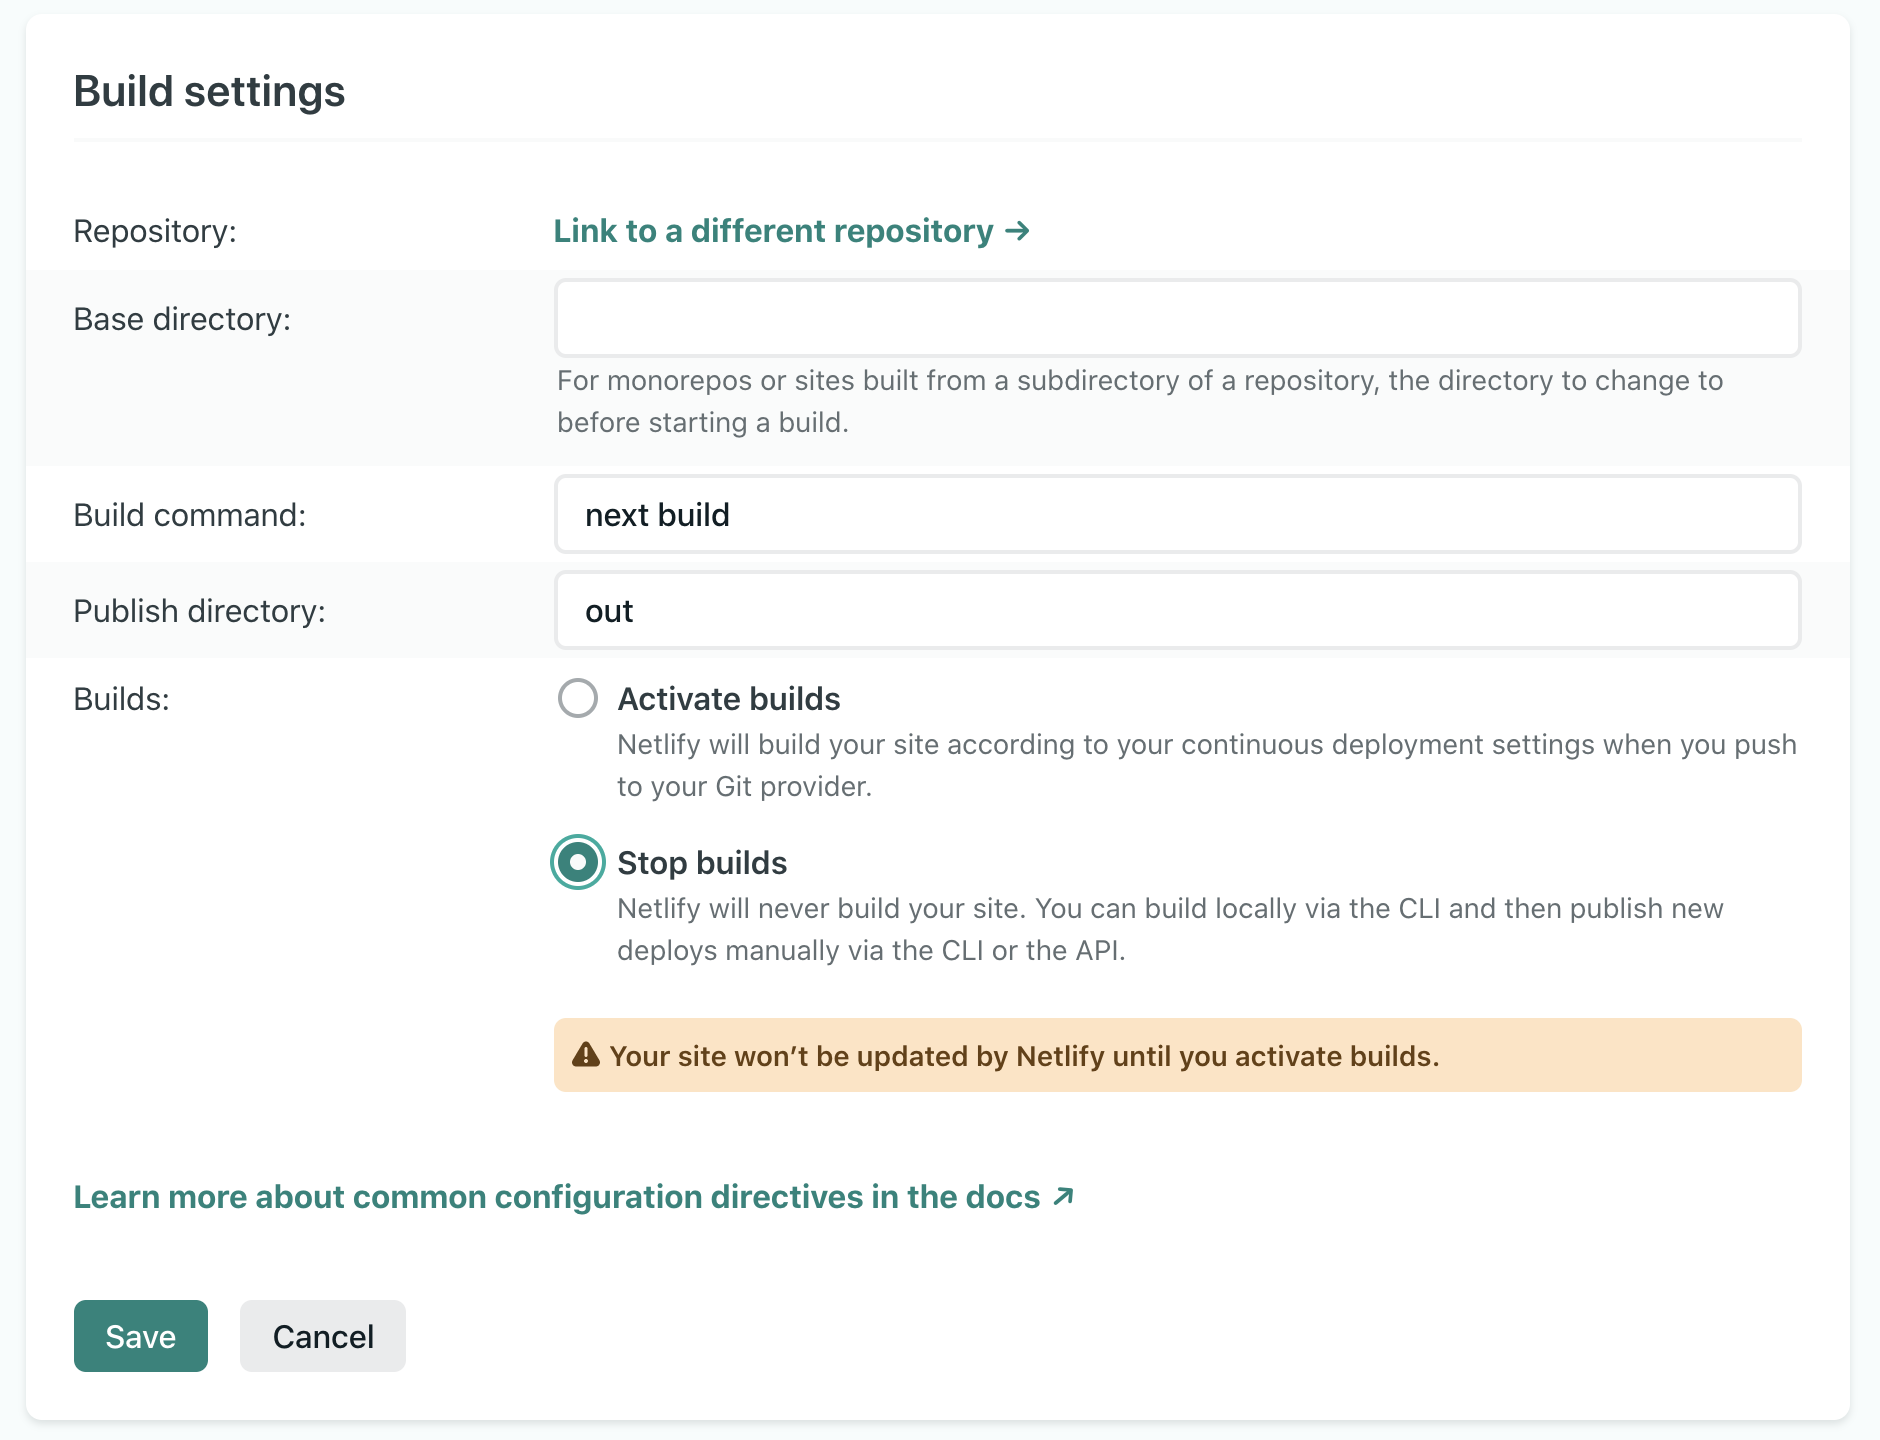 Netlify build settings off
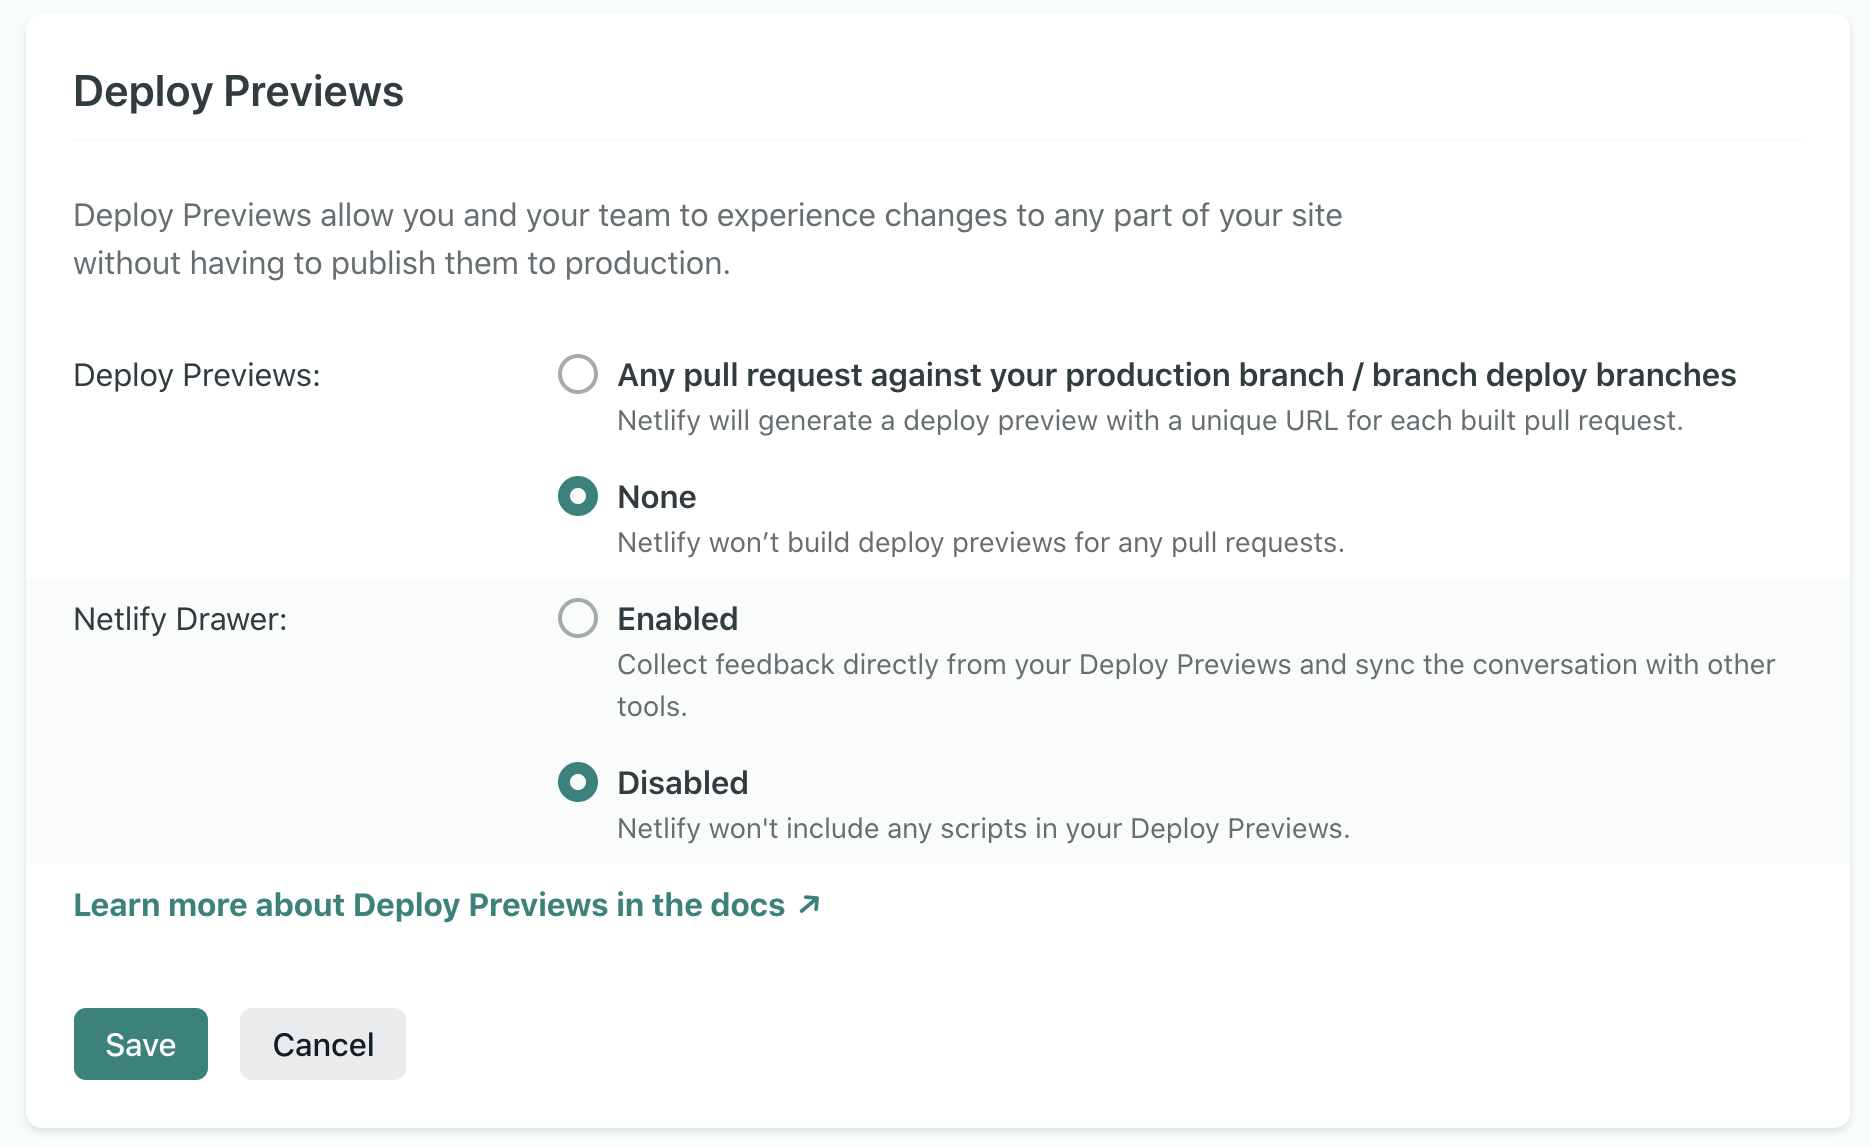 Netlify deploy previews off, thanks though!
Configuring Github Actions
There’s two final setting up tasks we need to do before digging in to the CI
pipeline. First, we need to define Netlify build configuration as code, so that
the build command we run on Github Actions knows what to do. For that, create a
netlify.toml file in your project folder with the following content:
[build]
  command = "npm run build"
  publish = "out"

[[plugins]]
  package = "@netlify/plugin-nextjs"
We’re specifying the build command to run, the location of the publish directory, and finally that Netlify should run their Next.js plugin so the server side bits are turned into Netlify functions. This is a good time to make sure we have this plugin installed so CI can run it:
yarn add -D @netlify/plugin-nextjs
We’re also going to need the great netlify-cli, as that’s what we will be using to build and deploy our website. Install it as a dev dependency so we’re pinned to the same version locally and on CI:
yarn add -D netlify-cli
The last bit of config has to do with Github secrets and environment variables.
As we’re deploying our Netlify site from Github, we’ll need to add two secrets
to the environment of the CI runners: the Netlify site ID and an auth token to
authorize the deployment operation. On Github, go to your repository Settings,
then Secrets so you can expose the following secrets:
NETLIFY_SITE_ID: which is shown on your site settings on Netlify asAPI IDNETLIFY_AUTH_TOKEN: you can generate one from your user page (they call it Personal Access Tokens)
Github Actions Workflows
Now that the setup is complete, we’ll be creating two different workflows - one
for pull requests that will trigger preview deploys (the preview of a branch on
a new, temporary environment) and another one for production deploys from the
main branch to your live site. Although both workflows share a few of the
steps, my experience is that soon they’ll become different enough to treat them
seperately. This way you can also use Github Actions
environments for
managing different values for your env variables.
Starting by the production workflow, create a .github/workflows/main.yml
with the following content:
name: Production build+deploy

on:
  push:
    branches:
      - main

jobs:
  deploy:
    runs-on: ubuntu-latest
    name: Build and deploy
    environment:
      name: production
      url: ${{ steps.deploy-netlify.outputs.NETLIFY_LIVE_URL }}
    steps:
      - name: Checkout code
        uses: actions/checkout@v2

      # Cache node modules and next folder
      - name: Caching
        uses: actions/cache@v2
        with:
          path: |
            **/node_modules
            ${{ github.workspace }}/.next/cache
          key: ${{ runner.os }}-modules-${{ hashFiles('**/yarn.lock') }}

      - name: Use Node.js 14.x
        uses: actions/setup-node@v1
        with:
          node-version: 14.x

      - name: Install dependencies
        run: |
          npm install -g yarn
          yarn install

      - name: Run tests
        run: yarn test

      # Using `netlify build` to build the website.
      # It will run the command specified on `netlify.toml` (`npm run build`)
      # and use the necessary plugin
      - name: Build project
        id: build-netlify
        run: |
          netlify build
        env:
          NETLIFY_AUTH_TOKEN: ${{ secrets.NETLIFY_AUTH_TOKEN }}
          NETLIFY_SITE_ID: ${{ secrets.NETLIFY_SITE_ID }}

      # Deploys the website to Netlify extracting the deploy metadata.
      # Adapted from the Netlify Github Action.
      - name: Production deployment
        id: deploy-netlify
        run: |
          COMMAND="netlify deploy --prod"
          OUTPUT=$(sh -c "$COMMAND")

          NETLIFY_LOGS_URL=$(echo "$OUTPUT" | grep -Eo '(http|https)://app.netlify.com/[a-zA-Z0-9./?=_-]*') # Unique key: app.netlify.com
          NETLIFY_LIVE_URL=$(echo "$OUTPUT" | grep -Eo '(http|https)://[a-zA-Z0-9./?=_-]*' | grep -Ev "netlify.com|(--)") # Unique key: doesn't contain -- and app.netlify.com

          echo "::set-output name=netlify_logs_url::$NETLIFY_LOGS_URL"
          echo "::set-output name=netlify_live_url::$NETLIFY_LIVE_URL"
        env:
          NETLIFY_AUTH_TOKEN: ${{ secrets.NETLIFY_AUTH_TOKEN }}
          NETLIFY_SITE_ID: ${{ secrets.NETLIFY_SITE_ID }}
So after our environment and dependencies are set up, we’re running tests
(assuming you have them 😅) and building the project using the Netlify CLI, and
finally deploying with the --prod flag, which makes it a production
deployment to the live site. We’re using the NETLIFY_AUTH_TOKEN and
NETLIFY_SITE_ID secrets we’ve defined earlier on the build and deploy
commands.
We’re using Github
Environments and
indicating this workflow should run in production. Github offers a few useful
features on a per-enviroment basis such as protection rules and the ability to
override env variables (there’s actually an example of that in the example
repository if you look
at the Test with overriding secrets per env action output from the main branch vs
other branches). We also specify the URL this deployment is going
to live in, so Github knows where this lives and populates the activity
log accordingly.
The way we’re parsing the output of the Netlify deploy command to extract the live and log URLs might look bit scary, but it’s based on code from the official Netlify Action so I think we’re ok.
To access all the configuration for your enviroments, head to your project
Settings and click Environments on the left hand side menu and, finally,
the environment name.
On the other hand, the preview deployment workflow currently looks like this:
name: Pull Request build+deploy

on:
  pull_request:
    branches:
      - main

jobs:
  deploy:
    environment: branch-deploy
    name: Build and deploy
    runs-on: ubuntu-latest
    steps:
      - name: Checkout code
        uses: actions/checkout@v2

      - name: Caching
        uses: actions/cache@v2
        with:
          path: |
            **/node_modules
            ${{ github.workspace }}/.next/cache
          key: ${{ runner.os }}-modules-${{ hashFiles('**/yarn.lock') }}

      - name: Use Node.js 14.x
        uses: actions/setup-node@v1
        with:
          node-version: 14.x

      - name: Setup deployment
        uses: bobheadxi/deployments@v0.6.0
        id: deployment
        with:
          step: start
          token: ${{ secrets.GITHUB_TOKEN }}
          env: branch-deploy-${{ github.head_ref }}
          ref: ${{ github.head_ref }}

      - name: Install dependencies
        run: |
          npm install -g yarn
          yarn install

      - name: Run tests
        run: yarn test

      - name: Build project
        id: build-netlify
        run: |
          netlify build
        env:
          NETLIFY_AUTH_TOKEN: ${{ secrets.NETLIFY_AUTH_TOKEN }}
          NETLIFY_SITE_ID: ${{ secrets.NETLIFY_SITE_ID }}

      # Slightly different regexes and var names here
      - name: Preview deployment
        id: deploy-netlify
        run: |
          COMMAND="netlify deploy -m ${{ github.head_ref }} --alias ${{ github.head_ref }}"
          OUTPUT=$(sh -c "$COMMAND")

          NETLIFY_URL=$(echo "$OUTPUT" | grep -Eo '(http|https)://[a-zA-Z0-9./?=_-]*(--)[a-zA-Z0-9./?=_-]*') # Unique key: --
          NETLIFY_LOGS_URL=$(echo "$OUTPUT" | grep -Eo '(http|https)://app.netlify.com/[a-zA-Z0-9./?=_-]*') # Unique key: app.netlify.com

          echo "::set-output name=netlify_preview_url::$NETLIFY_URL"
          echo "::set-output name=netlify_logs_url::$NETLIFY_LOGS_URL"
        env:
          NETLIFY_AUTH_TOKEN: ${{ secrets.NETLIFY_AUTH_TOKEN }}
          NETLIFY_SITE_ID: ${{ secrets.NETLIFY_SITE_ID }}

      - name: Update deployment status
        uses: bobheadxi/deployments@v0.6.0
        if: always()
        with:
          step: finish
          token: ${{ secrets.GITHUB_TOKEN }}
          status: ${{ job.status }}
          deployment_id: ${{ steps.deployment.outputs.deployment_id }}
          logs: ${{ steps.deploy-netlify.outputs.netlify_logs_url }}
          env_url: ${{ steps.deploy-netlify.outputs.netlify_preview_url }}
Here, we’ll be deploying pull_requests that target the main branch on every update (more specifically, on
opened, synchronize or reopened events).
We’re now working in the branch-deploy environment, so that’s where the
configuration will be loaded from, but we’re not specifying a URL this time as
we’ll potentially have multiple preview deployments active at the
same time, from different branches. That’s why, for this workflow, we’re using a
seperate Github Action to handle
deployments manually,
creating a different “release” environment for each deployment so we can have a seperate
deployment log per
branch, in the format
“branch-deploy-branch-name”.
This will also enrich our PR page with the status and a link to the live deployment:
 Github Pull Request with Deployment info (link)
Github Environments seem like a great tool for non-transient environments, like
production or staging, where there’s a single environment that persists and
gets updated with each deploy. It seems to be less targeted at this specific use
case of having a class of deployments (ie, branch deployments) that would want
to share some configuration like environment variables, while keeping releases
independent. With the set-up shown here, we’re kinda able to have both -
setting common configuration on the branch-deploy environment and checking
deployment logs on “branch-deploy-branch-name” or on the PR directly - but it
feels a bit hackish. Let me know if there is a better way of handling this that
I’ve missed!
Other tools to throw in the mix
In the example repository put together as an example/starting point, I’ve configured some other tools that I’d want more often than not to include:
- Jest has been setup as the testing framework to run your unit and integration tests. There’s a very basic unit test that checks if the main title renders on the index page as a proof of concept.
- Prettier has been included as a dev dependency so code formatting is automated and consistent within the team (IDE allowing!).
On short-lived, proof-of-concept like projects, we’ve also been often drawn to the following 3rd parties and tools:
- Firebase, specifically for their database-as-a-service (Firestore). It’s a decent document store, with a generous free tier plan and SDKs for everything. One of the killer features is the ability to query the database directly from the front-end JS SDK, made possible by configuring a rule engine that allows or denies each read/write request depending on the operation and, optionally, user authentication. This can be managed as code and included in your CI/CD pipeline (stuff for another blog post!).
- Auth0, a very comprehensive, solid service for user management and authentication. You could just use Firebase Authentication, especially if you’re making use of rules for authenticated users, but making both work together is not difficult either.
- TailwindCSS for component styling or, if needing more out of the box functionality, Chakra UI as a component library.
As always, there’s a lot to consider when picking your tech stack, and particularly for fast-paced projects familiarity plays a big role, so this doesn’t intend to be in any way prescriptive! I do hope that by either starting from the project template or just by taking some ideas out of this blog post you get from zero to a fully-working production grade web app even quicker!
Feedback is welcome, you can find me on Twitter or drop a line on the HN post for this article.
Reviewed by @siame, many thanks 🙌. Thanks to @braposo and @xade for your feedback as well.