Creating a Miro Clone in the browser
Introduction
We recently worked with a client who asked us to create a freestyle web canvas, for adding various types of ‘Card’. We love a challenge so got to work on the requirements:
- Panning and Zooming
- Add Cards from a pop up tray
- Cards should not overlap
- Drag Cards on the canvas
Too long didn’t read (TLDR)
This was a complex epic, and there was definitely some head scratching. However we finished it on time and the end result is beautiful, responsive and fully covered by end to end tests. We used DndKit for dragging and dropping, D3 Zoom for panning and zooming and Cypress for the tests, which were all a pleasure to work with, and we would do so again.
Panning and Zooming
A very stripped down version of the Canvas component is shown below, with the code required to hook up to D3 Zoom, and to apply the tranform.
The transform is applied to the canvas element, and the browser will automatically apply the transform to anything under it in the DOM tree, so nothing on the canvas needs to do anything.
export const Canvas = ({ children }: CanvasProps) => {
  const canvasRef = useRef<HTMLDivElement | null>(null);

  // store the current transform from d3
  const [transform, setTransform] = useState(d3.zoomIdentity);

  // update the transform when d3 zoom notifies of a change
  const updateTransform = ({ transform }: { transform: d3.ZoomTransform }) => {
    setTransform(transform);
  };

  // create the d3 zoom object, and useMemo to retain it for rerenders
  const zoomBehavior = useMemo(() => d3.zoom<HTMLDivElement, unknown>(), []);

  useLayoutEffect(() => {
    if (!canvasRef.current) return;

    // get transform changed notifications from d3 zoom
    zoomBehavior.on("zoom", updateTransform);

    // attach d3 zoom to the canvas div element, which will handle
    // mousewheel and drag events automatically for pan / zoom
    return d3
      .select<HTMLDivElement, unknown>(canvasRef.current)
      .call(zoomBehavior);
  }, [zoomBehavior, canvasRef]);

  // animated Zoom In, which can be called from a button event (not shown in this example)
  const zoomIn = () => {
    d3.transition()?.call(zoomBehavior.scaleBy, 1.5);
  };

  return (
    <div ref={canvasRef}>
      <div
        style={
          // apply the transform from d3
          transformOrigin: "top left",
          transform: `translate3d(${transform.x}, ${transform.y}, ${transform.k})`,
        }
      >
        {children}
      </div>
    </div>
  );
};
Drag Drop from Tray
In order to create insightful visual arrangements, users wanted to be able to see all of their cards in a tray, and to drag them from there on to the canvas. None of the DndKit examples were that close to what we wanted, so we had to strike out on our own (although the documentation is excellent, which made things easier.)
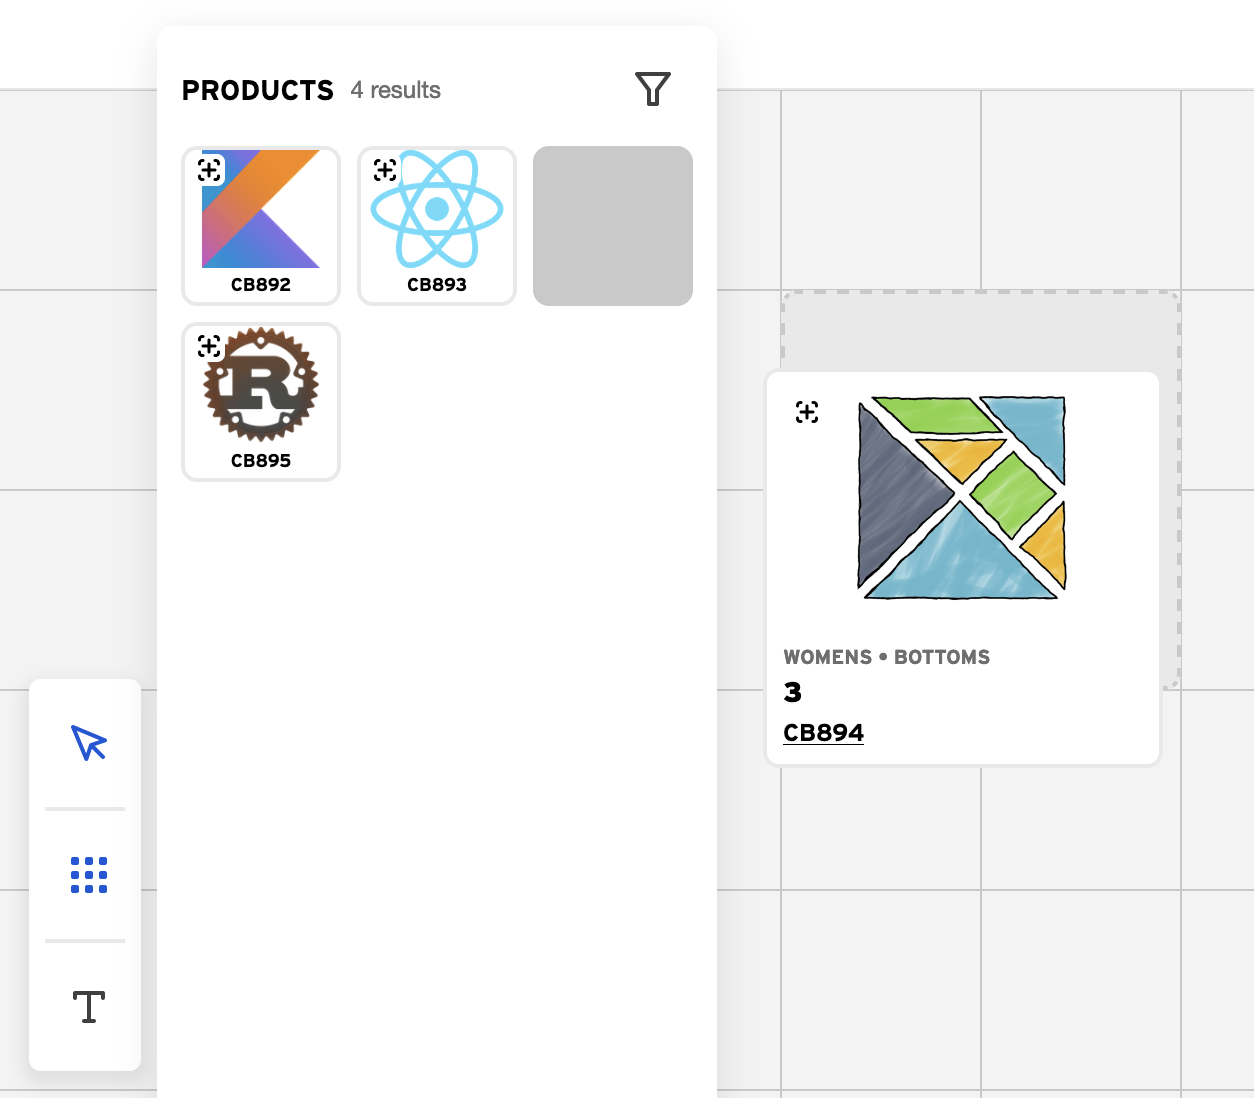
Display cards on the canvas
When an item is drag / dropped from the tray it needs to appear on the canvas, so firstly we simply hard coded a list of cards to display. These had an x, y position on the canvas, and all the information they needed to render. We sized the cards to match the grid size, and used the code below to position the cards on the canvas.
<div
  css={
    position: "absolute",
    origin: "top left",
    top: `${pixelCoordinates.y}px`,
    left: `${pixelCoordinates.x}px`,
  }
>
  {children}
</div>
Allow dropping when dragged over the canvas
In our UI, the tray popped up over the canvas, and being as the canvas was a drop target, it was initially possible to drop a card on to the canvas without having first dragged it off the tray.
To fix this we created a custom strategy to work out the drop target by composing existing DndKit strategies (as recommended by the documentation).
We first check to see if the current drag position is intersecting with the tray, and if so we return that. If not we fallback to the standard DndKit behaviour. This requires us to set up the tray as a drop target, and for the drop event to check what drop target was found (and to ignore the tray if this is the target).
The code for the custom strategy is like this
const customCollisionDetectionStrategy = () => {
  return (args: {
    active: Active;
    collisionRect: ViewRect;
    droppableContainers: DroppableContainer[];
  }) => {
    if (args.active.rect.current.translated) {
      const targetScaled: ViewRect = {
        ...args.active.rect.current.translated,
      };

      const trayRect = args.droppableContainers.filter(
        (droppableContainer) => droppableContainer.id === "tray"
      );

      const intersectingTrayRect = rectIntersection({
        active: args.active,
        collisionRect: targetScaled,
        droppableContainers: trayRect,
      });

      if (intersectingTrayRect) {
        return intersectingTrayRect;
      }

      const otherRects = args.droppableContainers.filter(
        (droppableContainer) => droppableContainer.id !== "tray"
      );

      return rectIntersection({
        active: args.active,
        collisionRect: targetScaled,
        droppableContainers: otherRects,
      });
    }

    return "";
  };
};
The drag overlay / mouse cursor should size based on the currrent zoom level of the canvas (so that it displays as it will appear on the canvas)
The Canvas has a transform property (from D3), which has an x and a y property to define the panning, and a k property to define the zoom.
We already had canvas card components from earlier, but the zoom transform was being applied to the parent canvas component, so we still needed to size the drag overlay correctly.
This was achieved using the same scale transform that was applied to the canvas:
<div
    style{
        transformOrigin: 'top left',
        transform: `scale(${transform.k})`,
      }
>
Calculate canvas position of dropped cards
To work out the position on the canvas, we need to know a few things:
- The zoom level of the canvas
- The panning position of the canvas (relative to the window / viewport)
- The drop position (relative to the window / viewport)
The canvas position is then (panning position - drop position) / zoom
We already store and have access to the zoom level and the panning position of the canvas, but the drop position is a bit trickier.
The DndKit drop event gives us the delta of the drag operation, but sadly doesn’t give us the initial position of the drag. It does however allow us to attach some custom data via a ref in useDraggable, so we store getBoundingClientRect() as initialRect, and can access it in the drop event with active.data.current.initialRect. This allows us to calculate the window / viewport drop position, which then allows us to calculate the drop position on the canvas.
The full code looks like this. transform controls the pan (x, y) and zoom (k) of the canvas.
const calculateCanvasPosition = (
    initialRect: DOMRect,
    over: Over,
    delta: Translate
) =>
  scaleCoordinates(
    {
      x: initialRect.x + delta.x - (over?.rect?.offsetLeft ?? 0) - transform.x,
      y: initialRect.y + delta.y - (over?.rect?.offsetTop ?? 0) - transform.y,
    },
    transform.k
  );

const scaleCoordinates = (coords: Coordinates, scale: number): Coordinates =>
  {
    x: coords.x / scale,
    y: coords.y / scale,
  };
Snap to grid
Once we have worked out a position on the grid, snapping to a grid is trivial! We just need to decide on the grid size, and then round the coordinates to it. There is even a nice example in the DnDKit docs.
Our code looked like this
export const snapCoordinates = ({ x, y }: Coordinates): Coordinates => ({
  x: snapCoordinate(x, gridSize),
  y: snapCoordinate(y, gridSize),
});

const snapCoordinate = (value: number, gridSize: number) =>
  Math.round(value / gridSize) * gridSize;
Drag and drop
Once we have all these items in place, we can integrate with DndKit.
There is a DndContext, that DndKit uses to store all the state:
<DndContext
  sensors={sensors}
  onDragStart={handleDragStart} // stores the activeCard
  onDragMove={handleDragMove} // uses doCardsCollide (see "Cards should not overlap" later)
  onDragEnd={handleDragEnd} // uses calculateCanvasPosition, adds activeCard to children
  collisionDetection={customCollisionDetectionStrategy()}
>
  {children}
</DndContext>
Then each component on the tray can useDraggable to enable drag and drop.
export const Addable = ({ id, children }: Props) => {
  const [ref, setRef] = useState<Element | null>(null);

  const { attributes, listeners, setNodeRef } = useDraggable({
    id,
    data: { initialRect: ref?.getBoundingClientRect() },
  });

  const updateInitialRectAndForwardRef = (element: HTMLDivElement | null) => {
    setRef(element);
    setNodeRef(element);
  };

  return (
    <div ref={updateInitialRectAndForwardRef} {...listeners} {...attributes}>
      {children}
    </div>
  );
};
Drag Cards on the canvas
Once the cards are on the canvas, we can use DndKit again to make them draggable. This is a bit different to dragging / dropping from the tray, as nothing new gets added to the canvas, and instead an existing item changes position.
The DndContext is much the same as before
<DndContext
  sensors={sensors}
  onDragStart={handleDragStart} // stores the activeCard
  onDragMove={handleDragMove} // uses doCardsCollide (see "Cards should not overlap" later), updates pixelCoordinates
  onDragEnd={handleDragEnd} // updates position of activeCard
>
  {children}
</DndContext>
The cards on the canvas are slightly more complex, as they have to position themselves on the canvas, and update their position temporarily while they are being dragged.
export const Draggable = ({
  id,
  pixelCoordinates,
  k,
  children,
}: DraggableProps) => {
  const { attributes, listeners, setNodeRef, transform } = useDraggable({
    id,
    data: { pixelCoordinates, id, ownId },
  });

  return (
    <div
      // position of card on canvas
      css={
        position: "absolute",
        origin: "top left",
        top: `${pixelCoordinates.y}px`,
        left: `${pixelCoordinates.x}px`,
      }
      // temporary change to this position when dragging
      style={
        transform
          ? { transform: `translate3d(${transform.x}, ${transform.y}, 0)` }
          : {}
      }
      ref={setNodeRef}
      {...listeners}
      {...attributes}
    >
      {children}
    </div>
  );
};
Cards should not overlap
One of the requirements was that cards should not overlap on the canvas, so we needed to detect when collissions would occur and prevent them.
There are two collision detection scenarios, when drag dropping from the tray, and when dragging around the canvas. The 2 situations are very similar, the main differences being that the calculation of the canvas position is different when dropping from the tray, and a card being dragged around the canvas doesn’t need to worry about colliding with itself.
The cards themselves are square, so the code to detect whether two cards collide is trivial. The one minor complication is that the collission detection has to take place after the coordinates are snapped to the grid.
const doCardsCollide = (card1: Coordinates, card2: Coordinates) =>
  Math.abs(card1.x - card2.x) < cardSize &&
  Math.abs(card1.y - card2.y) < cardSize;
When dragging, if a card on the canvas would collide, we add a red overlay to it. When dragging around the canvas, we show the last known good position of a card with a dashed outline, which is where the card will go if it is dropped. This updates as a card is dragged, and snaps to the grid. Where a card on the canvas would cause a collission, the last known position simply stays where it is, until the dragged card is moved in to a collission free space.

Testing
We added Cypress Custom Commands, like the one below to make it easy to write end to end tests.
The wrap command turns a jquery object in to a cypress object (that you can then chain other cypress comannds off), and the trigger command creates simulated events. There is a slight annoyance in that there are quite a few events triggered in response to various mouse operations, but it is all encapsulated in the custom command so writing the tests is still easy. { prevSubject: 'element' } specifies that the dragOntoCanvas command can only be chained off cypress commands that yield element’s.
Cypress.Commands.add(
  "dragOntoCanvas",
  { prevSubject: "element" },
  (
    item: JQuery<HTMLElement>,
    { startCoordinates, endCoordinates }: DragOntoCanvasOptions
  ) => {
    // `force: true` shouldn't be needed, but the tests think that
    // the drag overlay is covering the canvas (which is true) and
    // that this prevents mouse operations (which is false)
    const force = { force: true };
    const leftButton = { button: 0 };

    const dragStart = { ...leftButton, ...startCoordinates };
    const dragOver = { ...endCoordinates, ...force };
    const drop = { ...leftButton, ...endCoordinates, ...force };

    const pointerEvent = { eventConstructor: "PointerEvent" };
    const mouseEvent = { eventConstructor: "MouseEvent" };
    const dragEvent = { eventConstructor: "DragEvent" };

    cy.wrap(item)
      .trigger("pointerdown", { ...pointerEvent, ...dragStart })
      .trigger("mousedown", { ...mouseEvent, ...dragStart })
      .trigger("dragstart", { ...dragEvent, ...force });

    cy.findByTestId("canvas")
      .trigger("dragover", { ...dragEvent, ...force })
      .trigger("mousemove", { ...mouseEvent, ...dragOver })
      .trigger("pointermove", { ...pointerEvent, ...dragOver });

    cy.findByTestId("canvas")
      .trigger("drop", { ...dragEvent, ...force })
      .trigger("mouseup", { ...mouseEvent, ...drop })
      .trigger("pointerup", { ...pointerEvent, ...drop });
  }
);
We can then use the custom command in tests like this.
cy.findAllByText("cb894").dragOntoCanvas({
  start: { clientX: 50, clientY: 50 },
  end: { clientX: 700, clientY: 200 },
});
Wrapping up
So there with have it! A fully tested custom web canvas that you can drag cards to, and then rearrange.
It took around one sprint to spike, and then another to get to v1, and there have been subsequent iterations to add features and improve performance, which may become topics for future posts!
If this sounds like the sort of work you would like to do then come join us, or if you are tackling a similar problem at your company please get in touch.